
Add your first monitor
This content is not available in your language yet.
This page takes you from a fresh install to a first alert in your inbox. Each step says what you should see on screen. If it does not match, go to When something goes wrong.
You need about ten minutes and the address of one thing to watch: a server, a NAS, a switch or a website.
1. First launch
Section titled “1. First launch”- Start DumbMonit (see Docker) and open
https://<your-host>:8080. - Your browser warns about the certificate. This is expected: DumbMonit makes a self-signed one at first start. Accept it once. To replace it, see HTTPS and encryption.
- You see Let’s create your account. Fill in:
- Setup code: printed in the server logs. Run
docker compose logs dumbmonit | grep -A1 "setup code"and copy the code (for exampleK7XQ4-M9PRT). - Username (no spaces) and a password of at least 12 characters. A whole phrase is safer than a complicated word.
- Setup code: printed in the server logs. Run
- Click Create account and continue. You are signed in.
2. The setup wizard
Section titled “2. The setup wizard”Right after sign-in, a short wizard can walk you through the basics. Every step can be skipped, and everything is changeable later in Settings. Use Continue, Skip this step, or Skip setup to leave. It covers: the instance name, language and time zone; an agent; your first monitors; a notification channel; an optional on-call rotation; optional single sign-on; and data retention. You can reopen it from Settings → System.
The three first steps
Section titled “The three first steps”On a brand-new instance the overview shows a short guide instead of an empty page: add your first monitor, connect a way to be told, check a message arrives. Each step is one button, and each turns green on its own. The third only counts a message that really left a channel, so creating a channel and never testing it does not tick it.
The guide is kept on the instance, not in the browser. Skipping a step or the whole guide skips it for every user. It disappears for good once the three steps are settled, and it never appears on an instance that already had monitors and a channel.
3. Add a monitor
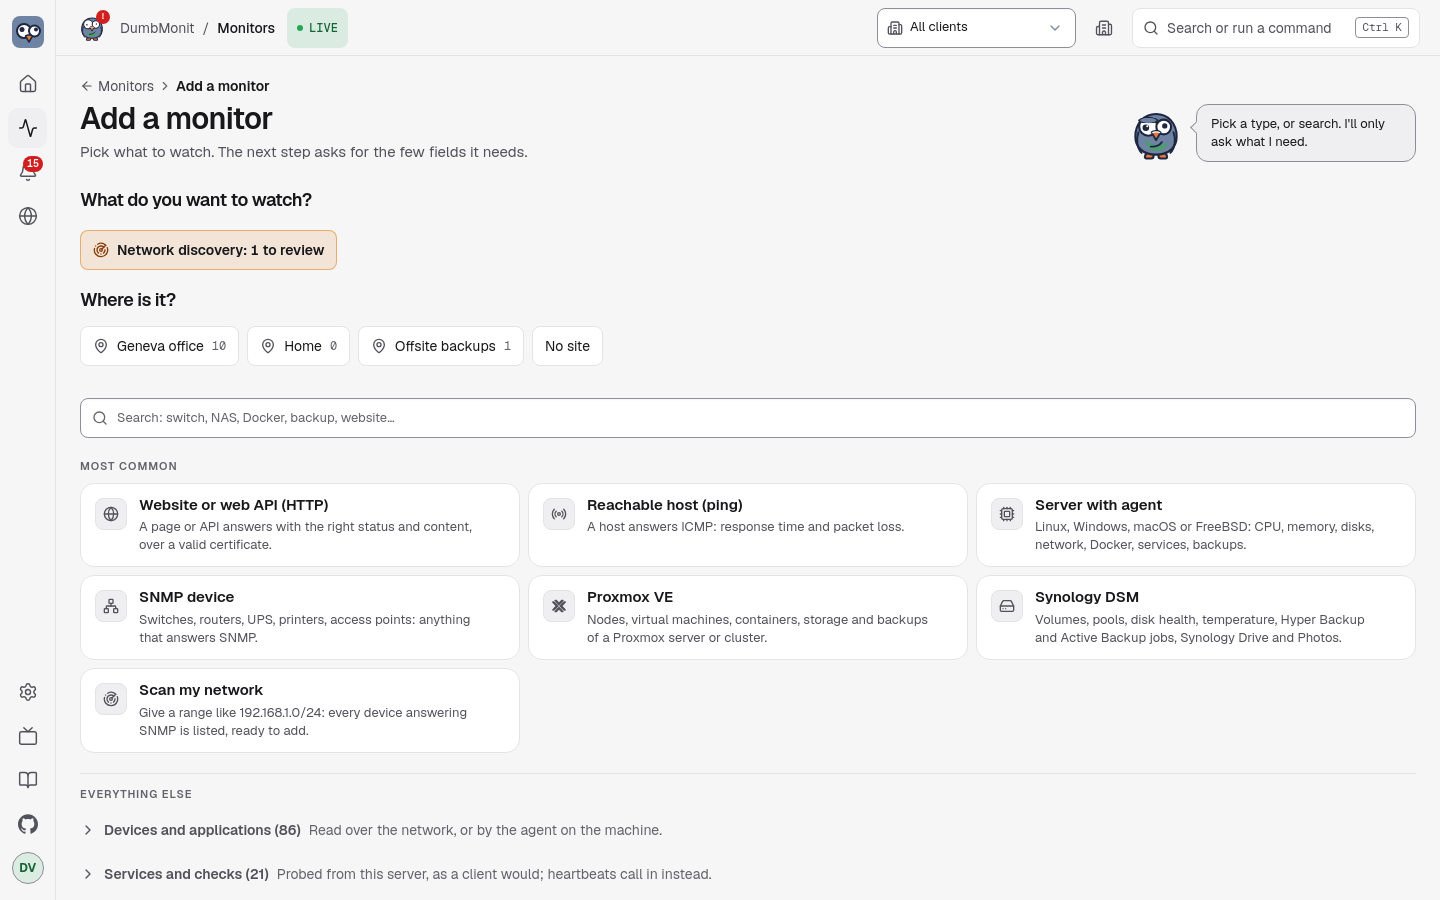
Section titled “3. Add a monitor”- Open Monitors and click Add a monitor (or press ++ctrl+k++ and type “add”).
- Where is it? DumbMonit first asks for a site, which is a place on the world map. Pick one of your locations, or No site. There is no default site: a monitor with No site is simply not tied to a place on the map. Sites are optional, so with no location at all you go straight to the list of types.
- Pick a type. The most common ones come first; use the search box (Search: switch, NAS, Docker, backup, website…) for the rest.
- A notice on the right (or above on a phone) lists what to prepare on the device. The form only shows the fields that matter for that type.
- Fill in the form and click Add monitor.
You land on the monitor. A grey light means it is waiting for its first answer. Within a minute it turns to Reporting and the first values appear.
A server with the agent
Section titled “A server with the agent”The agent is a small program that runs on the machine and sends its readings to DumbMonit. No address or password to type: the machine introduces itself with a token.
- Add a monitor, choose a site, then Server with the agent.
- Choose the machine’s system: Linux / macOS, Windows or Docker. For a machine behind a firewall at another site, choose to reach the server through a relay instead of Directly (see Monitor a remote site).
- Click Create the install command. You see the command, the token and a Shown once label. Copy the command now: the token is not displayed again.
- The page checks that machines can reach the encrypted agent channel (TCP 8443). You should see Encrypted agent channel reachable at … (TLS 1.3). If not, see the troubleshooting below.
- On the machine, run the command with elevated rights:
sudoon Linux and macOS, an administrator PowerShell on Windows. For Docker, copy the Docker command or the two Compose lines. - Back on the page, Waiting for the agent’s first report… turns into
hostis connected (os) within seconds. - Give the machine a Name, optionally a Folder and a Site, then Save. Open the machine shows its page.
To tune the agent later, open the monitor and click the gear (settings): the agent settings, relay mode, log collection, the services to watch and re-enrolment are there. Details: the agent.
A Synology NAS
Section titled “A Synology NAS”Two ways, and you can combine them on the same NAS (see Package or API?).
- DumbMonit Agent package (DSM 7 only): you install a
.spkon the NAS, which connects out to DumbMonit. No port is opened and no DSM password is stored. - DSM API credentials (DSM 6 and 7): DumbMonit logs into DSM with a read-only account.
Step by step for each: Synology agent and Synology DSM.
Add an SNMP device
Section titled “Add an SNMP device”SNMP is the most universal type: almost every piece of network hardware speaks it. Switches, routers, NAS, UPS and printers are the usual suspects.
- On the device, enable SNMP v2c and note the read-only community (
publicby default on many devices). If the device filters by address, allow the DumbMonit server’s address. - In DumbMonit, click Add a monitor and pick a site (or No site).
- Pick SNMP device. The form shows the SNMP fields.
- Enter a name, the address (IP or host name) and the community. For SNMP v3, switch the credential to SNMP v3 and fill in the user name and the authentication and privacy passphrases.
- Click Add monitor. You should see the monitor page, then interfaces and, on servers and NAS, CPU, memory and storage within a minute.
The collection profile is detected automatically from the device’s
sysObjectID, in the background, so the form never waits for an unreachable
device. Interfaces, and on servers and NAS the CPU, memory and storage, appear
within a minute.
Scan a network
Section titled “Scan a network”Rather than typing monitors one by one, scan a range:
- On Add a monitor, open the Scan my network panel.
- Enter a network in CIDR notation, for example
192.168.1.0/24(up to 4096 addresses per scan), and the community to try on every address (publicby default). - Every address that answers is listed with its
sysName, description and the profile that would be applied. Monitors already in DumbMonit are marked Already added, and everything new is ticked for you. - Untick what you do not want, then click Add n monitors. They are created one by one, each row showing its own outcome, so one failure never stops the rest.
Add a Proxmox VE server
Section titled “Add a Proxmox VE server”The same flow, with a credential in two fields rather than one:
- In Proxmox, create a user reserved for monitoring, a read-only role and an
API token — the four
pveumcommands are in the notice next to the form, with a copy button each, and on the Proxmox VE page. Never reuse the account you log in with. - In DumbMonit, Add a monitor → Proxmox VE.
- Enter a name and the address of any node (port 8006 by default).
- Copy the token’s full-tokenid (
dumbmonit@pve!monitor) into Token ID and its value (the UUID) into Secret. Pasted the wholeuser@pve!name=secretstring into Token ID by mistake? The form splits it and says so. - Proxmox ships with a self-signed certificate: tick Accept an unverifiable certificate under More options if the first probe complains about it.
- Click Add monitor.
Proxmox Backup Server works the same way with
proxmox-backup-manager; a Synology NAS takes a
dedicated DSM account (user name and password); a
server with the agent needs no credential at all, only
the enrollment token shown once the monitor is saved.
4. Get notified
Section titled “4. Get notified”Built-in alert rules apply as soon as a monitor exists: monitor unreachable, CPU saturated, disk almost full and so on. Nothing to configure. They only reach you once a channel exists.
- Open Settings → Notifications (or use the Connect a way to be told step of the guide).
- Click Add a channel and pick a type: email, ntfy, Discord, Telegram, PagerDuty and more. Fill in the fields it asks for.
- Click Send a test. You should see Test sent, and the message should arrive. Built-in rules notify every enabled channel.
- To see a real alert, pause the monitored device or unplug it. After the delay of the rule the alert appears under Alerts → Now, and the channel gets the message.
All channel types and their settings: Notifications. The alerts page: Alerts.
When something goes wrong
Section titled “When something goes wrong”| What you see | What to do |
|---|---|
| The monitor stays grey after a minute | Open it and click Probe now (pulse icon). It reports how many samples it got. |
| A red message under the address | Read it: wrong community, refused certificate, missing permission. Fix it with the gear; leaving the secret empty keeps the stored one. |
| Unreachable | The device did not answer: check the address, a firewall, and that the device is on. |
| Agent: Port 8443 is not published | Publish the port: under ports: in docker-compose.yml, add "8443:8443", then docker compose up -d. Open TCP 8443 in the server firewall. |
| Agent: No answer on port 8443 | A firewall drops the traffic, or the address is wrong. Open the page with the address the machine uses to reach the server. |
| Agent: the machine never appears | Check the service on the machine: journalctl -u dumbmonit-agent -f (Linux). See Common errors. |
| Test message does not arrive | Check the channel’s fields and your spam folder, then send the test again. |
More in the FAQ.
The setup notice
Section titled “The setup notice”Every type carries its own notice, written by the server and shown next to the form: numbered steps to do on the device (create a read-only user, create an API token, allow the address…), with the exact menu path in the product and a copy button on every command or value, then a common pitfall and a link to the vendor’s documentation when there is one. The per-kind pages in this documentation carry the same steps word for word — a test in the server keeps them identical: SNMP, Proxmox VE, Proxmox Backup Server, Synology DSM, agent, services.
The principle behind every notice: a dedicated read-only account, never the one you log in with. A leaked monitoring secret must not be able to change anything.
Common fields
Section titled “Common fields”Whatever the type, the form has:
| Field | Meaning |
|---|---|
| Name | How the monitor appears in lists and alerts. |
| Address | IP, host name, host:port or URL depending on the type; the placeholder shows the expected shape. |
| Credential | The families the type accepts, each with its own fields: community, SNMP v3 user and passphrases, Proxmox token (Token ID + Secret), user name and password. Secrets have a show/hide eye and pasted values are cleaned of stray spaces, quotes and line breaks. Stored encrypted, never returned by the API: on edit, blank fields keep what is saved. |
| Check interval | How often DumbMonit reads the monitor. Default 60 s, minimum 10 s. |
| Parent monitor | If the parent goes down, alerts from this monitor are suppressed instead of sent. See dependency suppression. |
| Enabled | A paused monitor is not checked and raises no alerts. |
| Tags | Free key/value labels, copied on every series as tag_<key>. Type-specific options live here too, under More options. |
What happens next
Section titled “What happens next”- The monitor shows up on the Monitors page: status light, name, kind, address, last seen.
- Measurements are written to VictoriaMetrics every 5 seconds
(
DUMBMONIT_FLUSH_INTERVAL_SECS), so the first graph appears after the first probe plus a few seconds. Probe now on the monitor page forces a probe and reports how many samples and series it produced: it is the main diagnostic tool.